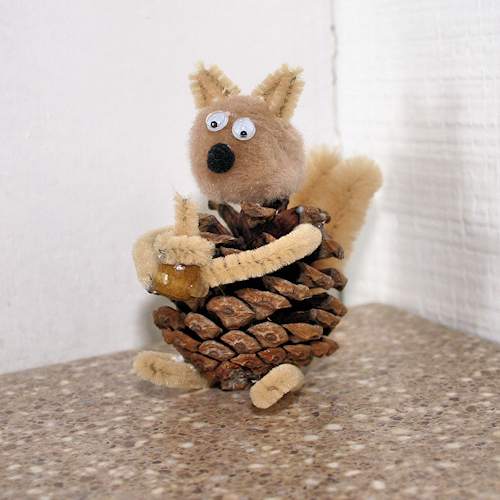
Follow these step-by-step directions and create an adorable squirrel using a pine cone and a few other supplies.
• Age Guideline: 5 Years and Up
• Time Required: 20 minutes
MATERIALS:
• Pine Cone
• 1-inch Pom-pom (If you use a larger pine cone, you will want to use a larger pom-pom)
• Wiggle Eyes
• 5mm Pom-pom
• Bumpy Chenille Stem
• Regular Chenille Stem
• Wooden Bead
• Craft Glue (You can also use a Hot Glue Gun and Glue Sticks)
• Old Scissors or Wire Cutters (For Cutting Chenille Stems)
MAKE THE HEAD:
Start out by gluing the 1-inch pom-pom on the pointy end of the pine cone. The pom-pom will be the squirrel’s head and the pine cone will be the body.
MAKE THE FACE:
Once you have the head glued on, use your glue to attach at wiggle eyes onto the head and also the nose (the 5mm pom-pom).
MAKE THE EARS:
To make the ears, cut two pieces of chenille stem, about an inch long, and fold them in half to form a ‘V’ shape. Glue each inverted ‘V’ onto the top of the squirrel’s head to look like ears. If you prefer, you can also use scrap pieces of felt or craft foam to make the ears.
MAKE THE TAIL
For the tail, I cut off 2 bumps from the chenile stem. I folded them in half and twisted the ends together. Glue the twisted end of the chenille stem bumps to the back of the pine cone to form the tail. Bend the top of the tail down a bit to give it a little shape.
MAKE THE FEET:
For the squirrel’s feet, cut two pieces of chenille stem about 2-inches long. Fold each piece in half and glue them to the bottom, front edge of the pine cone body.
MAKE THE ARMS:
For the squirrel’s arms, cut two more pieces of chenille stem, again, about 2-inches long. Glue one to each side of the pine cone body.
ADD THE ACORN:
For a finishing touch, make a small acorn by gluing a small piece of chenille stem to a wooden bead. I simply rolled the leftover tan chenille stem I used into a small, tight spiral. Glue the acorn into the squirrel’s hands.
Courteous of www.About.com